Thay vì vào trang imgur.com để úp ảnh lấy link thì nay mình làm cái này để tự úp ảnh lên Blog mình luôn cho tiện.
 |
| Tạo trang úp ảnh lấy link Imgur cho blogspot mới nhất. |
Trước kia có rất nhiều bài viết hướng dẫn làm trang úp ảnh này nhưng đa số là code cũ bị lỗi. Bài viết này sẽ hướng dẫn các bạn làm một cách nhanh nhất với code mới nhất cho các bạn. Cùng xem hướng dẫn ở dưới nhé!
Hướng dẫn
Bước 1: Đăng nhập Blogger > Vào phần Trang và tạo Trang mới
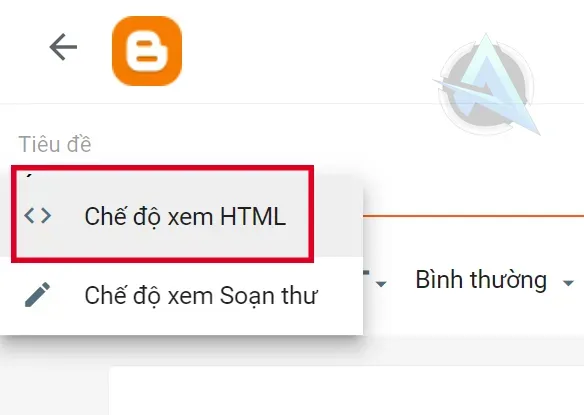
Bước 2: Đặt tên cho tiêu đề Trang, sau đó tại mục hình cây bút chọn phần Chế độ xem HTML:
 |
| Chế độ xem HTML. |
Bước 3: Các bạn copy toàn bộ phần code dưới đây và paste vào Trang:
<style>
body.loading .loading-modal{display:block}
.dropzone{border:2px dashed #999;border-radius:10px;position:relative;margin:0 auto;clear:both;}
.infoimg{margin:0 auto;margin-top:20px;margin-bottom:20px}
.dropzone p{margin:0;text-align:center;width:100%;font-weight:bold;color:#999}
.input{height:100%;left:0;outline:0;opacity:0;position:absolute;top:0;width:100%;cursor:-webkit-zoom-in}
.status{border-radius:5px;text-align:center;margin-left:auto;margin-right:auto}
.image-url{width:calc(100% - 10px);padding:5px;border:1px solid #999;border-radius:5px;color:#999}
.linkimg{margin:20px 0}
.dropzone.dropzone-dragging{border-color:#000}
.loading-modal{background-color:rgba(255,255,255,.8);display:none;position:fixed;z-index:1000;top:0;left:0;height:100%;width:100%}
.loading-table{margin-left:auto;margin-right:auto;margin-top:15%;margin-bottom:15%}
</style>
<div class="dropzone">
        <div class="infoimg"></div>
</div>
<script type="text/javascript">
  /* Imgur Upload Script */
(function (root, factory) {
    "use strict";
    if (typeof define === 'function' && define.amd) {
        define([], factory);
    } else if (typeof exports === 'object') {
        module.exports = factory();
    } else {
        root.Imgur = factory();
    }
}(this, function () {
    "use strict";
    var Imgur = function (options) {
        if (!this || !(this instanceof Imgur)) {
            return new Imgur(options);
        }
        if (!options) {
            options = {};
        }
        if (!options.clientid) {
            throw 'Provide a valid Client Id here: https://api.imgur.com/';
        }
        this.clientid = options.clientid;
        this.endpoint = 'https://api.imgur.com/3/image';
        this.callback = options.callback || undefined;
        this.dropzone = document.querySelectorAll('.dropzone');
        this.infoimg = document.querySelectorAll('.infoimg');
        this.run();
    };
    Imgur.prototype = {
        createEls: function (name, props, text) {
            var el = document.createElement(name), p;
            for (p in props) {
                if (props.hasOwnProperty(p)) {
                    el[p] = props[p];
                }
            }
            if (text) {
                el.appendChild(document.createTextNode(text));
            }
            return el;
        },
        insertAfter: function (referenceNode, newNode) {
            referenceNode.parentNode.insertBefore(newNode, referenceNode.nextSibling);
        },
        post: function (path, data, callback) {
            var xhttp = new XMLHttpRequest();
            xhttp.open('POST', path, true);
            xhttp.setRequestHeader('Authorization', 'Client-ID ' + this.clientid);
            xhttp.onreadystatechange = function () {
                if (this.readyState === 4) {
                    if (this.status >= 200 && this.status < 300) {
                        var response = '';
                        try {
                            response = JSON.parse(this.responseText);
                        } catch (err) {
                            response = this.responseText;
                        }
                        callback.call(window, response);
                    } else {
                        throw new Error(this.status + " - " + this.statusText);
                    }
                }
            };
            xhttp.send(data);
            xhttp = null;
        },
        createDragZone: function () {
            var p1, p2, input;
                p1 = this.createEls('p', {}, 'Kéo file ảnh vào đây');
                p2 = this.createEls('p', {}, 'Hoặc click để chọn ảnh');
            input = this.createEls('input', {type: 'file', className: 'input', accept: 'image/*'});
            Array.prototype.forEach.call(this.infoimg, function (zone) {
                zone.appendChild(p1);
                zone.appendChild(p2);
            }.bind(this));
            Array.prototype.forEach.call(this.dropzone, function (zone) {
                zone.appendChild(input);
                this.status(zone);
                this.upload(zone);
            }.bind(this));
        },
        loading: function () {
            var div, table, img;
            div = this.createEls('div', {className: 'loading-modal'});
            table = this.createEls('table', {className: 'loading-table'});
            img = this.createEls('img', {className: 'loading-image', src: 'https://firebasestorage.googleapis.com/v0/b/huydc-090288.appspot.com/o/Images%20Upload%2Floading-spin.svg?alt=media&token=8a1fd8dc-30b2-4b74-acc6-9e4ce55a89b0'});
            div.appendChild(table);
            table.appendChild(img);
            document.body.appendChild(div);
        },
        status: function (el) {
            var div = this.createEls('div', {className: 'status'});
            this.insertAfter(el, div);
        },
        matchFiles: function (file, zone) {
            var status = zone.nextSibling;
            if (file.type.match(/image/) && file.type !== 'image/svg+xml') {
                document.body.classList.add('loading');
                status.classList.remove('bg-success', 'bg-danger');
                status.innerHTML = '';
                var fd = new FormData();
                fd.append('image', file);
                this.post(this.endpoint, fd, function (data) {
                    document.body.classList.remove('loading');
                    typeof this.callback === 'function' && this.callback.call(this, data);
                }.bind(this));
            } else {
                status.classList.remove('bg-success');
                status.classList.add('bg-danger');
                status.innerHTML = 'Invalid archive';
            }
        },
        upload: function (zone) {
            var events = ['dragenter', 'dragleave', 'dragover', 'drop'],
                file, target, i, len;
            zone.addEventListener('change', function (e) {
                if (e.target && e.target.nodeName === 'INPUT' && e.target.type === 'file') {
                    target = e.target.files;
                    for (i = 0, len = target.length; i < len; i += 1) {
                        file = target[i];
                        this.matchFiles(file, zone);
                    }
                }
            }.bind(this), false);
            events.map(function (event) {
                zone.addEventListener(event, function (e) {
                    if (e.target && e.target.nodeName === 'INPUT' && e.target.type === 'file') {
                        if (event === 'dragleave' || event === 'drop') {
                            e.target.parentNode.classList.remove('dropzone-dragging');
                        } else {
                            e.target.parentNode.classList.add('dropzone-dragging');
                        }
                    }
                }, false);
            });
        },
        run: function () {
            var loadingModal = document.querySelector('.loading-modal');
            if (!loadingModal) {
                this.loading();
            }
            this.createDragZone();
        }
    };
    return Imgur;
}));
  var feedback = function(res) {
    if (res.success === true) {
        var get_link = res.data.link.replace(/^http:\/\//i, 'https://');
        document.querySelector('.status').classList.add('bg-success');
        document.querySelector('.status').innerHTML =
            '<div class="linkimg"><input class="image-url" id="copylinkimg" onclick="this.select()" value=\"' + get_link + '\"/></div>' + '<div class="showimg"><img class="img" alt="Imgur-Upload" src=\"' + get_link + '\"/></div>';
    }
};
new Imgur({
    clientid: '3a8be4390ef3eb8',
    callback: feedback
});
</script>
Lưu ý: 3a8be4390ef3eb8 là Client ID để tool có thể hoạt động, để chủ động hơn bạn tạo account tại imgur.com sau đó vào link sau để tạo và lấy Client ID riêng tránh việc mình xóa hoặc thay đổi Client ID này tool của bạn sẽ không hoạt động nữa
Cách lấy Client ID imgur
Đầu tiên các bạn tạo cho mình một tài khoản imgur xong đã.
Tiếp đến ae vào đây để tạo Client ID: https://api.imgur.com/oauth2/addclient.
 |
| Điền thông tin vào như này, có thể chọn callback để add callback url. |
Sau khi điền thông tin như ảnh các bạn bấm Sumbit là OK nó sẽ ra Client ID cho các bạn lấy chèn vào code ở trên.
Kết luận
Khá đơn giản để tạo một trang úp ảnh lấy link Imgur cho blogspot phải không nào. Chúc các bạn tạo thành công. Cảm ơn các bạn đã ghé xem!


